This is How to host a Minecraft Server for free. Requires a computer and internet access.
Playing Minecraft can be a much more enjoyable experience when playing with some friends. Unfortunately getting a bunch of people together with PC’s and laptops can be a little difficult. By setting up and hosting a Minecraft Server you can allow your friends to join in from where ever they might be in the world.
In the following How To Host a Minecraft Server tutorial we will show you everything you need to know about setting up a Minecraft server from your computer and allowing access from the outside world. Some of the directions can be done out of order but it is best to just following along with us.
Minecraft Server Install Sections:
Contents
- Download & Install Minecraft (Steps 1-7)
- Get Your Local IP Address (Steps 8 & 9)
- How to Port Forwarding (Steps 10-12)
- Configure Minecraft Properties (Allow Free Version Users) (Steps 13 & 14)
- Get your external IP Address & Connect (Steps 15-17)
At the end of this tutorial you will be able to share and play Minecraft free with members or free version users. Just give them your IP Address.
Download & Install Minecraft Server
1. Head over to Minecraft.net by typing “Minecraft Server Download” into your browser or clicking on this link –> https://minecraft.net/en-us/download/server
2: Download the minecraft_server.1.XX.X.jar by clicking on the link and then clicking on the pop up to save the file.
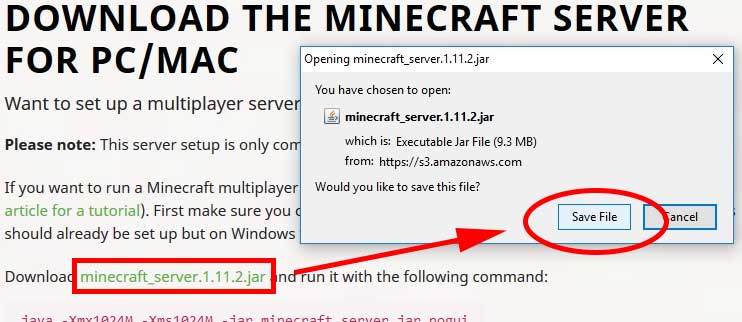
3. Locate your Minecraft download from your downloads folder and copy or paste it into its own folder. For this tutorial we have named our folder “Minecraft Server” you can call yours whatever you want though. The folders name has no effect on the Minecraft hosting configuration.
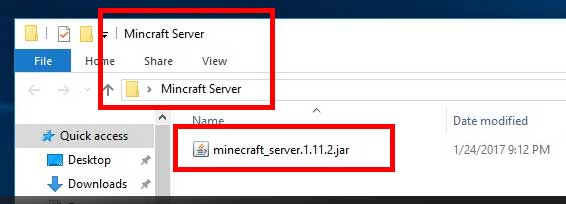
4. Double click the executable “minecraft_server1.xx.x.jar” and you should see the following files extracted in the folder now.

5. Open the eula.txt in notepad. (We suggest notepad but you many choose another text editor)
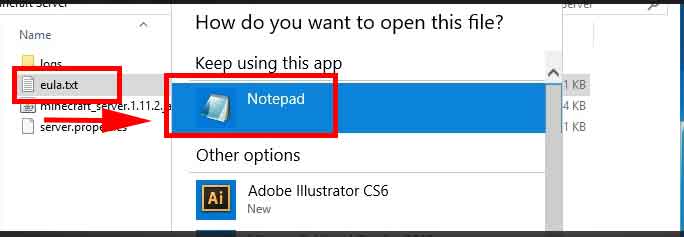
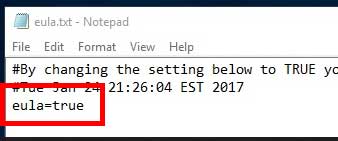
6. Change the eula=false to eula=true. Then save and close the file.
7. Double click the minecraft_server.1.XX.X.jar again. You should now see additional files that have been extracted to your Minecraft server folder. The Server Application Window should also pop up. You can close the application for now, but keep the folder open.
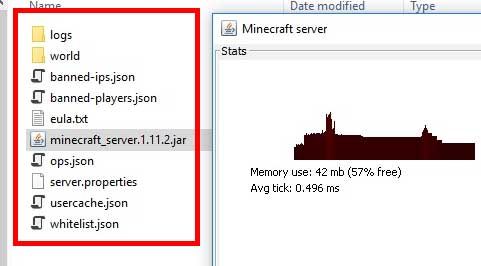
You now have the server. But your only partly there. Next you need to allow outside internet connections to this server.
Get Your Local IP Address
At this point you can’t connect to your server from the outside world. Let’s fix that! We need to get our local IP Address to enter in to our router configuration, for the how to port forward section.
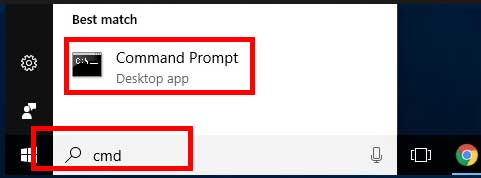
8. Type “cmd” (without quotes) into your windows search or run bar. Open the “Command Prompt” window.
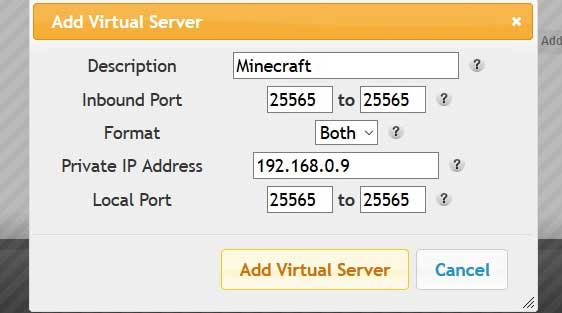
9. In the command prompt window type “/ipconfig” (without quotes) and hit enter. Look for the “IPv4 Address”, you might have to scroll up a little bit. Write down your “IPv4 Address” for later. Mine is 192.168.0.9. Also, write down your default Gateway. My Default is 192.168.0.1
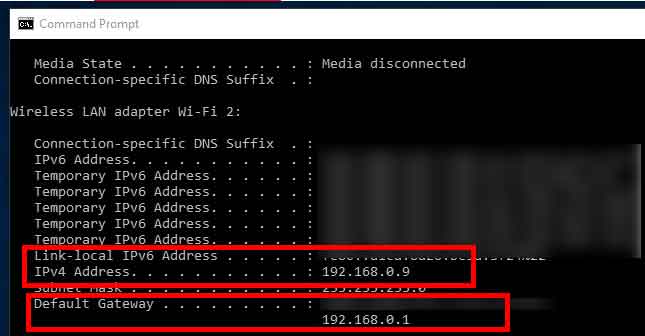
You can now close the command prompt window. Next we have to head over to your web browser and allow access over the internet to your server. We will configure your router settings by setting up port forwarding on your local IP Address you just found.
How to Port Forward
10. With any browser open type in your “192.168.x.x“(Just YOUR Default gateway numbers no quotes) into the URL bar. And hit enter. You will be taken to your routers Login page. If you don’t know your credentials, the login credentials can usually be found on the bottom of your router, or modem. Most commonly it is “admin” and “password” or “User” and “Pass”, or a combination of the two. Hit the apply or login button.
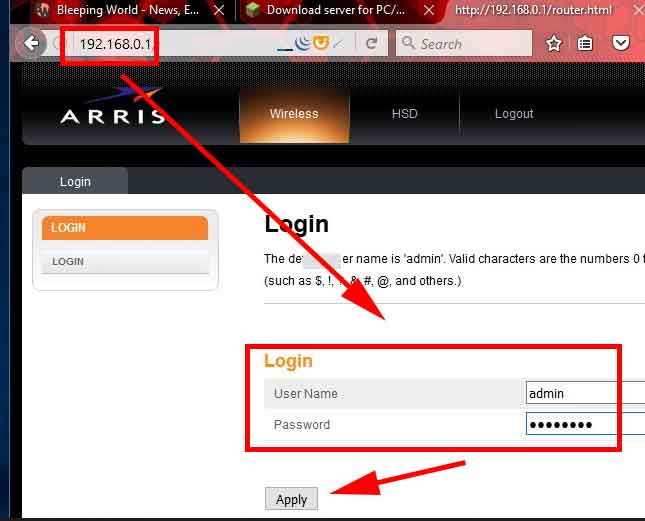
11. Find your Port Forwarding sections. Getting to your “Port Forward” page may very depending on your router brand. Look for tabs or sections along the top or on the side. It could be called “port forwarding”, “Virtual Servers” Click around till your find a screen that looks like mine.
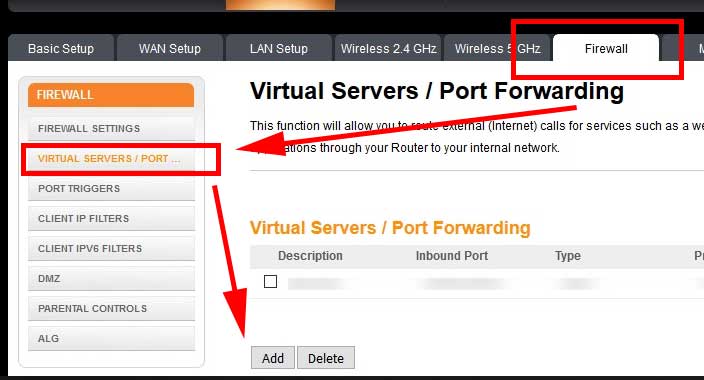
12. Click the “add” button or you might already have the screen that shows you input boxes for your IP Address. If so just start entering that local IPv4 address you collected earlier. The Name or description can be anything. The Inbound port is 25565 to 25565. Format is “Both” or use TCP
Configure Minecraft Properties
NOTE* you only need to complete the steps in this section if you have friends that didn’t pay for the game or are playing Minecraft free. Otherwise Skip this section.
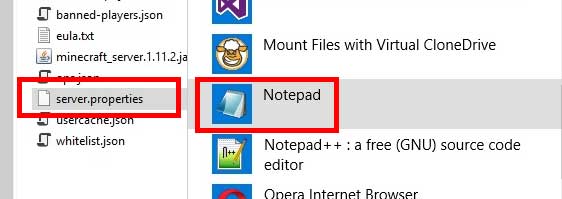
13. Head over to your Minecraft folder again. Highlight Server.properties and right click it, find open with and choose notepad and hit ok.
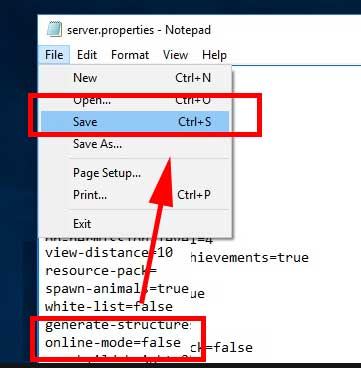
14. Look for “online-mode=true” and change it to “online-mode=false” Now, Save the file. WARNING* Do NOT “Save as”, Just “Save”. (If you “save as” a text file then you will need to delete it and save the correct way.)
Now your friends that play Minecraft free can join your Minecraft server. But not quite yet, they still need your Server’s IP Address. Continue to the next section of this how to host a Minecraft server tutorial.
Get Your External IP Address & Connect
15. Grab your IP address HERE or go to your browser and search “What’s my Ipv4”. Choose one of the google results that has IPV4 in the title. Write this down. Mine is 72.228.242.156. These are the numbers that you will need to enter in the Minecraft multiplayer screen.

16. Start up your server by clicking on double clicking on the Minecraft server jar again. (This has to be open at all times in order for people to connect to your Minecraft world.)
17. Give your friends the IPV4 that you collected off of the internet. Mine is 72.228.242.156. When they login to Minecraft, have them click “Multiplayer”, then the “Add Server” Button at the bottom right. Server Name can be anything. Server Address is where they enter the numbers that you just gave them.
*NOTE: When they hit the done button and go back to the server list screen they may have to click the “refresh” button a couple of times to get the server to show up.
Congratulations! We hope this has helped you connect with your Minecraft friends. If you enjoyed our how to host a minecraft server or if you’re having any trouble let us know.
Minecraft Localhost Server OR Local LAN World
This “How to host a Minecraft Server” tutorial is not the same as Setting up Minecraft “Local LAN World”. The Minecraft local LAN World is different because its purpose is to connect people that are all on the same network. That means that you must all be in the same building using the same WiFi connection, or connected to the same router.
This Tutorial was to setup a Server people can connect to no matter where they are in the world. The “Minecraft local LAN” While much easier to set up is only meant for people in the same area or close playing proximity to each other.
We will update this article with links to “How to host a Minecraft Server Local LAN World” once it has been published [coming soon].



![A Better [Buy Now] Button | Call-to-Action Tips & Tricks](https://www.bleepingworld.com/wp-content/uploads/2019/11/A-Better-Buy-Now-Button-Call-to-Action-Tips-Tricks-800x445.jpg)

